Let’s start the 2021 New Year with SOLID Principles

Firstly, let’s figure out what do you meant by SOLID Principles. SOLID principles are set of five principles that can be used in Object-Oriented programming. It’s a set of best practices / design patterns to follow when you are designing a class/object structure.

One famous quote in software engineering is “It is not enough for code to work” by Robert C Martin, Clean Code. Keeping that in mind let’s evaluate the SOILD principles and how it will help software development in the long run.

When and why we need to apply SOLID?

SOLID principles will help us to lay the foundation on building clean and maintainable architectures.

When you don’t design your application with best practices, you will end up with many issues sooner than later. For examples

  • High Code Fragility: Fragility is the tendency of the software to break in many places when every time its changed
  • High Code Rigidity: Rigidity is the tendency for software to be difficult to change, even in simple ways

Having fragility and rigidity in your project means having symptoms of tech debt, which is the silent killer of all software projects. In most of the software development process, with the business priority and push towards for quick delivery, engineers tend to prioritize fast delivery over code quality which will tend to introduce technical debt.

Applying SOLID principles help us to control the technical debt.  What are those SOLID Principles?

  1. SRP – Single Responsibility Principle
  2. OCP – Open Close Principle
  3. LSP – Liskov Substitution Principle
  4. ISP – Interface Segregation Principle
  5. DIP – Dependency Inversion Principle

Let’s take each principle one by one and understand it in very high level so we can apply them in our projects.

Single Responsibility Principle (SRP)

A Class should do only one thing, and therefore it should have only a single reason to change. Some of the common responsibilities in our code are, Business Logic, User Interface, Persistence, Logging and Orchestration.

A common anti-pattern is that, In an Invoice class having the implementation of printInvoice and saveToFile like functions. Ideally those two should be in different classes. Those classes might be InvoicePrinter and InvoicePersistence and those classes will have a single responsibility.

Also avoid common Utils class for having all helper functions. Have specialized classes where you can have them.


Open Close Principle (OCP)

OCP means, Classes should be open for extension and closed to modification. Closed for modification means that each new feature should not modify existing source code. Open for extensions means a component should be extendable to make it behave in new ways.

There are two OCP implementation strategies. One is via Inheritance and other via Strategy pattern. The common usage is to use the strategy pattern to extend the behaviors. For example, having an interface called InvoicePersistence and implementing any number of different classes (DB persistence, File Persistence) based on the main interface. This ensure Invoice Persistence is extendable in many ways.


Liskov Substitution Principle (LSP)

What is Liskov principle? In simple terms, “Any object of a type must be substitutable by objects of a derived typed without altering the existing functionality of that program”. Rather than thinking about the Is-a relationship, just think on Is-substitutable-by in object relationships of your application context and design the objects hierarchy is the key takeaway of LSP. We will observe violations of LSP, when there are partial implemented interfaces in classes (functions which are throwing not implemented exception).  Therefore, avoid empty implementations and have proper class hierarchy to avoid such scenarios.


Interface Segregation Principle (ISP)

The key point to note here is that, the term interface is not referring to Java Interface. It can be an interface or abstract class in your application. By definition ISP defined as “Clients should not be forced to depend on methods that they do not use”. Therefore, having small interfaces with a single focus will comply the ISP. By doing so, it will reinforce the LSP and SRP. Key advantage of lean interface is that, minimize dependencies on unused members and reduce code coupling. How to identify that you have “Fat” interface? it’s not much difficult, if you see an interface with large number of method definitions is a symptom for Fat interface. Analyze the interfaces and break it down is the way forward. If you are dealing with legacy code and wanted to refactor the code to adhere the ISP, then you can use the “Adaptor” design pattern to fix the existing issues.


Dependency Inversion Principle (DIP)

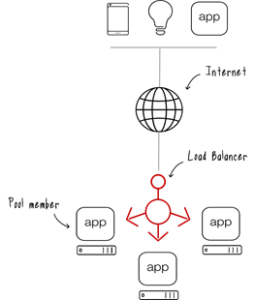
This principle mainly captures key two concepts, Dependency Injection (DI) and Inversion of Control (IoC) and how those should be used in our application. Those two concepts are well known concepts, following reference link will explain them in detail. (DI, IoC) Java framework like Spring framework have those two concepts in-build.

This conclude the five principles under SOLID principles. You can find good code samples under the reference section for each principle as well. In addition to SOLID, there are few other ways to keep your architecture clean, for example: constant refactoring, application of design patterns, TDD / Unit testing. When you apply SOLID Principles, you will also get the following as short and long-term benefits.

  • Code will be easy to understand and reason about
  • Changes are faster and have minimum risk level
  • Highly maintainable in the long run
  • Cost effective

Decision on applying them in correct scenario is totally up to you!


Reference

https://www.baeldung.com/solid-principles

https://www.digitalocean.com/community/conceptual_articles/s-o-l-i-d-the-first-five-principles-of-object-oriented-design#:~:text=SOLID%20is%20an%20acronym%20for,OOD)%20principles%20by%20Robert%20C.&text=O%20%2D%20Open%2Dclosed%20Principle,I%20%2D%20Interface%20Segregation%20Principle

https://app.pluralsight.com/library/courses/solid-software-design-principles-java/table-of-contents

https://refactoring.guru/design-patterns/adapter
https://dzone.com/articles/ioc-vs-di

Read More

Client Side Load Balancing Vs Server Side Load Balancing: How Client Side Load Balancing works?

Firstly let’s see what is load balancing;

It’s mainly distributing work of a computer to two or more similar computers. This ensures reliability and increases the responsiveness of the system.


Load balancer generally group in to two categories.

Layer 4: Act in network and transport layer protocols (IP, TCP, FTP, and UDP)

Layer 7: Distribute requests based upon data found in application layer protocols such as HTTP


Also Load Balancer (LB) reside in two types, (more information)

Hardware LB: F5 BIG-IP, Cisco, Citrix

Software LB: NGINX, HAProxy, LoadMaster


All these different load balancers uses different algorithms to distribute the load among the application pool. Some of the industry standard Load Balancing algorithms are:

  • Round robin: This method continuously rotates a list of services that are attached to it. When the virtual server receives a request, it assigns the connection to the first service in the list, and then moves that service to the bottom of the list.
  • Least connections: The default method, when a virtual server is configured to use the least connection, it selects the service with the fewest active connections.
  • Least response time: This method selects the service with the fewest active connections and the lowest average response time.

Now that’s all about the very basic theory in Load balancing. Now let’s see how Server side load balancing works in the real world.


Server Side Load Balancing

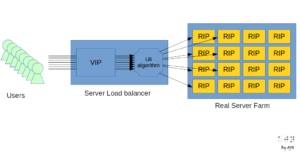
A Server side load balancer sits between the client and the server farm accepting incoming network and application traffic and distributing the traffic across multiple backend servers using various methods. Mostly load balancer will check the health of the server pool underneath and use the algorithm which we discussed earlier to distribute the load.  This was the most common mechanism we used in the past to manage our application load. However the upswing of Client Side Load Balancing is now on the peak. Let’s dig deep on that context.


Client Side Load Balancing

As we discussed, in the server side load balancing, a middle component is responsible for the distributing the client requests to the server. However that middle component is moving out on the decision making in the load distribution. Client itself will decide on the server it need to forward the request. How it work is very simple: Client holds the list of server IPs that It can deliver the requests. Client select an IP from the list randomly and forward the request to the server.

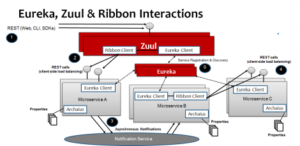
With the microservice architecture, Client side load balancing plays a major role. Services like Netflix Ribbon and Eureka components helps client side load balancing have similar features to server side load balancing like fault tolerance, caching and batching.

Let’s see how Eureka and Ribbon work together to achieve the client side load balancing in microservice architecture.


As per the above diagram, let’s assume Microservice B wants to communicate with Microservice C. So Microservice B is the client and now it will use the Eureka client and get what nodes (server list) are available in Microservice C. Then using ribbon client in the Microservice B, it will call the Microservice C using default round robin algorithm. So the method which Microservice B used to call Microservice C is known as client side load balancing. Which illustrates that client is the one decide on the server which need to call not a middle component like in Server side load balancing.


All the links are provided as references to get more inside on the topic we have covered. Especially how you can use Netflix OSS to achieve client side load balancing in microservice solutions.


References


Read More

Twelve factors to consider when developing cloud native applications (SaaS)

This is a basic introduction to cloud native application development. First we will get a basic idea about the cloud concept and then move in to the 12-Factors.


What is cloud computing environment?

It’s a dynamic environment, which have the capability to allocate resources and release of resources from a virtualized, shared pool. This elastic environment enables more flexible scaling options for a high demand applications.


What is cloud native application?

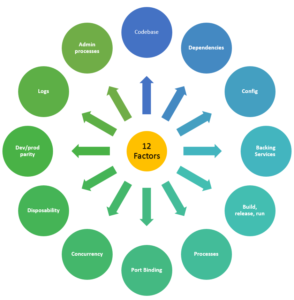
Applications or processes which are run in software containers as isolated units. Applications or services (microservices) are loosely coupled with explicitly described dependencies. There are set of best practices which you need to follow when you’re planning moving to cloud with your application. Those are known as the 12-factors. Let’s investigate on those 12-factors.


Twelve factors

The 12-factor application methodology was drafted by developers at Heroku. The factors represent a set of guidelines or best practices for portable, resilient applications that will thrive in cloud environments (specifically software as a service applications). Let’s move in to each factor and get a high level idea on how we can achieve / implement this in our application.

  1. There should be a one-to-one association between a versioned codebase: Main idea is not to have different codebases for your application versions. You can have branches for different versions as a solution to avoid repository complexity.


  1. Services should explicitly declare all dependencies, and should not rely on the presence of system-level tools or libraries: Main recommendation here is that avoid in pre-installed software in the system level which has a dependency with your application. As a solution we should try our level best to put application dependencies in our application manifest. Tools like Apache Maven can be used to maintain these dependencies in your application.


  1. Configuration that varies between deployment environments should be stored in the environment: In this scenario the recommendation is to avoid having environment (Development, Staging and Production) specific configuration with in your application code. If you have any environment specific configurations those need to be stored in the environment not in the application. To have the configuration files in a centralized location we can use the spring config server


  1. All backing services are treated as attached resources, which are managed (attached and detached) by the execution environment: Firstly backing service is any service that your application integrate with to perform its normal operations. So, examples for backing service would be database, web services, SMTP server or ftp server. Main idea of this practice is to treat those backing services as your own service.


  1. The delivery pipeline should have strictly separate stages: Build, release, and run: When we consider the three stages,
    • Build: Takes the source code and bundle to a package which referred as the build
    • Release: Combine the build and the config and create a release for deploy in an environment. Each release will have a unique identifier and related to a release management tool. It will ensure a quick rollback time.
    • Run: Referred as the runtime. Execute the application in the corresponding environment


  1. Applications should be deployed as one or more stateless processes: Specifically, transient processes must be stateless and share nothing. Persisted data should be stored in an appropriate backing service.


  1. Self-contained services should make themselves available to other services by listening on a specified port: This means each application are self-contained and expose access over a HTTP port that is bound to it. Spring boot framework is a good example for this, which is having a inbuilt server where you can configure the HTTP port easily


  1. Concurrency is achieved by scaling individual processes (horizontal scaling): Idea behind this is having multiple processes with distributed load. The application should be able to scale horizontally and handle requests load-balanced to multiple identical running nodes of the application. In addition application should be able to scale out processes or threads for parallel execution of work in an on-demand basis. This feature comes automatically with the JVM with multi-threading.


  1. Processes must be disposable: Fast startup and graceful shutdown. If we elaborate more our application should minimize the startup time like using backing services rather than using in-memory caching. Also in shutdown process, when we stop the application it should not accept new work and let existing work to finish. We can use a queue to push the work and then shutdown if required.


  1. All environments, from local development to production, should be as similar as possible: Development environment to production environment should be identical. It will ensure unexpected behavior in the application due to environment inconsistencies. Containerized environment like Dockers is a good solution for this.


  1. Applications should produce logs as event streams (for example, writing to stdout and stderr), and trust the execution environment to aggregate streams: Application should not attempt to write to or manage logfiles. This stream output should mainly managed by the execution environment. This stream can be shipped to a log indexing systems such as Splunk, ELK stack which facilitate as a centralized logging system.


  1. Run admin/management tasks as one-off process: If admin tasks are needed, they should be kept in source control and packaged alongside the application to ensure that it is run with the same environment as the application

References

Read More

Developing SOAP web service with Spring Boot and Spring-WS

In the current developer world, we speak very less about SOAP web services. This is due to the REST web services dominance in SOA world. However the need for SOAP services will never be zero.

In this document we will focus on how we can develop SOAP web services using popular Spring Boot framework and Spring-WS. When I searched the internet for tutorials I found this useful tutorial, which explain on how to develop SOAP services. There were some missing items in the tutorial and thought of adding them to have a complete steps tutorial.

Spring-WS mainly focus on document driven web services. Hence Spring-WS facilitate the contract-first SOAP web services development. Let’s see how we can develop a simple contract first web service using the following tool set.

  • Spring Boot 1.5
  • Spring-WS 2.4
  • Maven 3
  • Tomcat application server 7
  • Eclipse IDE

Final out put product would be a deployable war file which exposes a SOAP web service to its clients.

Let’s start the development

Initial Project Setup

  1. Create a maven project in eclipse

File –> New –> Other –> Maven Project –> Select “maven-archetype-webapp” –> Provide the Group Id and Artifact Id and save

  1. Create Build Path

Right click on the project –> Build Path –> Configure Build Path –> Under the “Source” tab remove the unsolved items and add the following folder to build path

  • src/main/java
  • src/test/java
  • src/test/resources


Creating the POM

  1. By default we have a POM file under the project structure to insert the dependencies.
  • We are using Spring Boot in our project and for testing we are using the embedded Apache Tomcat server
  • Parent POM of spring boot is used to facilitate the spring dependencies.
<parent>
    <groupId>org.springframework.boot</groupId>
    <artifactId>spring-boot-starter-parent</artifactId>
    <version>1.5.1.RELEASE</version>
</parent>
  • To facilitate the Spring-WS dependencies following dependency element included in the POM
<dependency>
    <groupId>org.springframework.boot</groupId>
    <artifactId>spring-boot-starter-web-services</artifactId>
</dependency>
  • To include the testing support on Spring Boot application following dependency for included in the POM
<dependency>
  <groupId>org.springframework.boot</groupId>
  <artifactId>spring-boot-starter-test</artifactId>
  <scope>test</scope>
</dependency>
  • To create a runnable jar, which can be run on the built it Tomcat: we will add the following plugin in the build tag
<build>
        <plugins>
            <plugin>
                <groupId>org.springframework.boot</groupId>
                <artifactId>spring-boot-maven-plugin</artifactId>
            </plugin>
            <plugin>
                <groupId>org.jvnet.jaxb2.maven2</groupId>
                <artifactId>maven-jaxb2-plugin</artifactId>
                <version>${maven-jaxb2-plugin.version}</version>
                <executions>
                    <execution>
                        <goals>
                            <goal>generate</goal>
                        </goals>
                    </execution>
                </executions>
                <configuration>
                    <schemaDirectory>                      ${project.basedir}/src/main/resources/wsdl</schemaDirectory>
                    <schemaIncludes>
                        <include>*.wsdl</include>
                    </schemaIncludes>
                </configuration>
            </plugin>
        </plugins>
</build>


  • Full POM files as follows
<?xml version="1.0" encoding="UTF-8"?>
<project xmlns="http://maven.apache.org/POM/4.0.0" xmlns:xsi="http://www.w3.org/2001/XMLSchema-instance"
    xsi:schemaLocation="http://maven.apache.org/POM/4.0.0 http://maven.apache.org/xsd/maven-4.0.0.xsd">
    <modelVersion>4.0.0</modelVersion>

    <groupId>com.codenotfound</groupId>
    <artifactId>spring-ws-helloworld-example</artifactId>
    <version>0.0.1-SNAPSHOT</version>
    <packaging>jar</packaging>

    <name>spring-ws-helloworld-example</name>
    <description>Spring WS - SOAP Web Service Consumer &amp; Provider WSDL Example</description>
    <url>https://www.codenotfound.com/2016/10/spring-ws-soap-web-service-consumer-provider-wsdl-example.html</url>

    <parent>
        <groupId>org.springframework.boot</groupId>
        <artifactId>spring-boot-starter-parent</artifactId>
        <version>1.5.1.RELEASE</version>
    </parent>

    <properties>
        <project.build.sourceEncoding>UTF-8</project.build.sourceEncoding>
        <project.reporting.outputEncoding>UTF-8</project.reporting.outputEncoding>
        <java.version>1.8</java.version>

        <maven-jaxb2-plugin.version>0.13.1</maven-jaxb2-plugin.version>
    </properties>

    <dependencies>
        <dependency>
            <groupId>org.springframework.boot</groupId>
            <artifactId>spring-boot-starter-web-services</artifactId>
        </dependency>
        <dependency>
            <groupId>org.springframework.boot</groupId>
            <artifactId>spring-boot-starter-test</artifactId>
            <scope>test</scope>
        </dependency>
    </dependencies>

    <build>
        <plugins>
            <plugin>
                <groupId>org.springframework.boot</groupId>
                <artifactId>spring-boot-maven-plugin</artifactId>
            </plugin>
            <plugin>
                <groupId>org.jvnet.jaxb2.maven2</groupId>
                <artifactId>maven-jaxb2-plugin</artifactId>
                <version>${maven-jaxb2-plugin.version}</version>
                <executions>
                    <execution>
                        <goals>
                            <goal>generate</goal>
                        </goals>
                    </execution>
                </executions>
                <configuration>
                    <schemaDirectory>${project.basedir}/src/main/resources/wsdl</schemaDirectory>
                    <schemaIncludes>
                        <include>*.wsdl</include>
                    </schemaIncludes>
                </configuration>
            </plugin>
        </plugins>
    </build>

</project>
  • Now to ensure all works accordingly, let’s build the application. Locate the directory location where your POM file reside and run the below command
mvn install


Creating the Contract (WSDL)

  1. Spring web services supports contract first approach only in web services development. So let’s start the with the WSDL (contract)
  • In a WSDL there are key elements
    • <types>
    • <message>
    • <portType>
    • <binding>
  • In our contract we have the following
    • XSD Schema which has two elements
      • “Person” : Request Object
      • “Greeting” : Response Object
    • Message elements
      • “SayHelloInput” : mapping of the XSD object to the message element
      • “SayHelloOutput” : mapping of the XSD object to the message element
    • PortType element
      • Binding the input/output messages to SOAP function “sayHello”
    • Binding element
      • Define the SOAP action and configuring the SOAP body for input/output
    • Service element
      • Defines the SOAP function and the message formats for the service which we are exposing
    • Detail WSDL as follows
<?xml version="1.0"?>
<wsdl:definitions name="HelloWorld"
    targetNamespace="http://codenotfound.com/services/helloworld"
    xmlns:tns="http://codenotfound.com/services/helloworld" xmlns:types="http://codenotfound.com/types/helloworld"
    xmlns:soap="http://schemas.xmlsoap.org/wsdl/soap/" xmlns:wsdl="http://schemas.xmlsoap.org/wsdl/">

    <wsdl:types>
        <xsd:schema targetNamespace="http://codenotfound.com/types/helloworld"
            xmlns:xsd="http://www.w3.org/2001/XMLSchema"
            elementFormDefault="qualified" attributeFormDefault="unqualified"
            version="1.0">

            <xsd:element name="person">
                <xsd:complexType>
                    <xsd:sequence>
                        <xsd:element name="firstName" type="xsd:string" />
                        <xsd:element name="lastName" type="xsd:string" />
                    </xsd:sequence>
                </xsd:complexType>
            </xsd:element>

            <xsd:element name="greeting">
                <xsd:complexType>
                    <xsd:sequence>
                        <xsd:element name="greeting" type="xsd:string" />
                    </xsd:sequence>
                </xsd:complexType>
            </xsd:element>
        </xsd:schema>
    </wsdl:types>

    <wsdl:message name="SayHelloInput">
        <wsdl:part name="person" element="types:person" />
    </wsdl:message>

    <wsdl:message name="SayHelloOutput">
        <wsdl:part name="greeting" element="types:greeting" />
    </wsdl:message>

    <wsdl:portType name="HelloWorld_PortType">
        <wsdl:operation name="sayHello">
            <wsdl:input message="tns:SayHelloInput" />
            <wsdl:output message="tns:SayHelloOutput" />
        </wsdl:operation>
    </wsdl:portType>

    <wsdl:binding name="HelloWorld_SoapBinding" type="tns:HelloWorld_PortType">
        <soap:binding style="document"
            transport="http://schemas.xmlsoap.org/soap/http" />
        <wsdl:operation name="sayHello">
            <soap:operation
                soapAction="http://codenotfound.com/services/helloworld/sayHello" />
            <wsdl:input>
                <soap:body use="literal" />
            </wsdl:input>
            <wsdl:output>
                <soap:body use="literal" />
            </wsdl:output>
        </wsdl:operation>
    </wsdl:binding>

    <wsdl:service name="HelloWorld_Service">
        <wsdl:documentation>Hello World service</wsdl:documentation>
        <wsdl:port name="HelloWorld_Port" binding="tns:HelloWorld_SoapBinding">
            <soap:address
                location="http://localhost:9090/codenotfound/ws/helloworld" />
        </wsdl:port>
    </wsdl:service>

</wsdl:definitions>


Java Code Implementation

  1. Now our contract is ready. And we have some element defined which we use in SOAP request / response objects. Using JAXB we can easily generate the Java classes associated with those elements
  • Create a folder under “/src/main/resources/” called “wsdl” and copy the created wsdl file to the new directory created
  • In the POM under <plugins> element we have configured a “maven-jaxb2-plugin” to facilitate this class creation
  • The generated java classes will be located in the “target” directory
  • To generate the those classes run the following command
mvn generate-sources


  1. The generated java classes will be in the “target” folder and we need add the folder to build path
  • Locate the following directory “/target/generated-sources/xjc”
  • Right Click on the folder –> Build Path –> Use as Source Folder


Now the initial setup is completed for the project. Let’s create the necessary packages and start implementing the code. As I mentioned earlier will continue on the post which was publish in www.codenotfound.com.  You can start with the Java code implementation of the link, which is creating the “SpringWsApplication ” class. Also in the tutorial you can download source code.


Generate a “WAR” file to deploy in Tomcat

If you want to generate a “WAR” file which can deploy in tomcat, please follow the below steps:

Change in the SpringBootApplication Class

package com.codenotfound;

import org.springframework.boot.SpringApplication;
import org.springframework.boot.autoconfigure.SpringBootApplication;
import org.springframework.boot.builder.SpringApplicationBuilder;
import org.springframework.boot.web.support.SpringBootServletInitializer;

@SpringBootApplication
public class SpringWsApplication extends SpringBootServletInitializer {

  @Override
  protected SpringApplicationBuilder configure(
      SpringApplicationBuilder application) {
    return application.sources(SpringWsApplication.class);
  }

  public static void main(String[] args) throws Exception {
    SpringApplication.run(SpringWsApplication.class, args);
  }
}


Changes in the POM.xml

  • Add the below dependencies
<dependency>
  <groupId>org.springframework.boot</groupId>
  <artifactId>spring-boot-starter-thymeleaf</artifactId>
</dependency>

<!-- marked the embedded servlet container as provided -->
<dependency>
  <groupId>org.springframework.boot</groupId>
  <artifactId>spring-boot-starter-tomcat</artifactId>
  <scope>provided</scope>
</dependency>


  • Update the <packaging> element from jar to war
<packaging>war</packaging>


  • Rerun the mvn command
mvn clean install


Read More