AWS Essentials Unveiled: Your Starting Point for Engineering Journey Mastery

Are you looking to distinguish yourself from other candidates applying for a Software Engineering position? If that’s the case, this blog will guide you in becoming that standout individual.

Software engineering encompasses a diverse range of areas, necessitating fundamental engineering skills for every individual. Furthermore, in today’s era, possessing practical expertise in cloud infrastructure is an essential asset for engineers aiming to excel in the information technology field. In this blog post, our focus will primarily be on exploring Nine vital AWS services that you should adeptly command, ensuring your prominence in the competitive landscape of the IT industry.


AWS Products

How many services and products does AWS offer within its cloud? As of August 2023, the count stands at approximately 239. Can you achieve mastery over all of them? Certainly, but is it a necessity? The answer is mostly no.

Now, let’s delve into the exploration of the Nine essential services you should aim to master in order to flourish on your engineering journey.


Identity & Access Management (IAM) IAM

AWS Identity and Access Management (IAM) is a web service that helps you securely control access to AWS resources. With IAM, you can centrally manage permissions that control which AWS resources users can access. 

Key Concepts to Master

  • Understanding IAM and its role in managing user access.
  • Creating users, groups, and roles.
  • Setting permissions and policies.

Video –> AWS IAM Core Concepts You NEED to Know


Basic Networking Concepts in AWS (VPC) VPC

Amazon Virtual Private Cloud (Amazon VPC), you can launch AWS resources in a logically isolated virtual network that you’ve defined. This virtual network closely resembles a traditional network that you’d operate in your own data center, with the benefits of using the scalable infrastructure of AWS.

Key Concepts to Master

  • Overview of Amazon VPC (Virtual Private Cloud)
    • A VPC is a virtual network that closely resembles a traditional network that you’d operate in your own data center. After you create a VPC, you can add subnets.
    • AWS Regions are physical locations around the world where Amazon clusters data centers for application and service delivery in AWS Availability Zones. 
    • An Availability Zone (AZ) is a grouping of one or more discrete data centers that provide applications and services in an AWS region.
  • Subnets, route tables, and security groups
    • A subnet is a range of IP addresses in your VPC. A subnet must reside in a single Availability Zone. After you add subnets, you can deploy AWS resources in your VPC.
    • Public & Private Subnet
    • Use route tables to determine where network traffic from your subnet or gateway is directed.
    • A security group acts as a firewall that controls the traffic allowed to and from the resources in your virtual private cloud (VPC). You can choose the ports and protocols to allow for inbound traffic and for outbound traffic.

Video –> AWS Networking Fundamentals


Deploy your services in EC2 EC2

Amazon EC2 provides scalable computing capacity in the AWS cloud. Leveraging it enables organizations to develop and deploy applications faster.

Key Concepts to Master

  • Launching, configuring, and connecting to EC2 instances.
    • A security group acts as a virtual firewall for your EC2 instances to control incoming and outgoing traffic. 
    • Inbound rules control the incoming traffic to your instance.
    • Outbound rules control the outgoing traffic from your instance. 
  • Overview of instance types, storage options
    • Instance type that you specify determines the hardware of the host computer used for your instance. Each instance type offers different compute, memory, and storage capabilities, and is grouped in an instance family based on these capabilities. 
    • Data Storage for the EC2 instances ranging from EBS and EFS
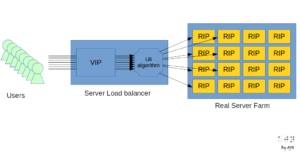
  • Elastic Loadbalancer 
    • Elastic Load Balancing automatically distributes your incoming traffic across multiple targets, such as EC2 instances, containers, and IP addresses, in one or more Availability Zones. 

Video –> Launch an AWS EC2 Instance Tutorial


Container Orchestration via Amazon ECS ECS

Amazon Elastic Container Service (Amazon ECS) is a fully managed container orchestration service that simplifies your deployment, management, and scaling of containerized applications. This service helps you to run your applications or services in docker containers.  

Key Concepts to Master

  • Amazon Elastic Container Registry (Amazon ECR) is a fully managed container registry offering high-performance hosting, so you can reliably deploy application images and artifacts anywhere.
  • Cluster – Logical group of container instances
  • Container Instance – EC2 instance in which ECS agents runs and is registered to cluster.
  • Task Definition – Description of application to be deployed
  • Task – An instantiation of task definition running on container  instance
  • Service – Runs and maintains predefined tasks simultaneously
  • Container – Docker Container created during task instantiation
  • ECS launch type – EC2 and Fargate 

Video –> Deploy an Application to Amazon ECS With EC2 | Docker | ECR | Fargate | Load balancer


Serverless computing with AWS Lambda Lambda

AWS Lambda is a serverless, event-driven compute service that lets you run code for virtually any type of application or backend service without provisioning or managing servers

Key Concepts to Master

  • Writing and deploying serverless functions
    • Serverless framework is a very good tool to deploy serverless applications 
  • Event triggers and integration with other AWS services.

Video –> How to Deploy AWS Lambda using Serverless Framework


Object Storage S3

Amazon Simple Storage Service (Amazon S3) is an object storage service offering industry-leading scalability, data availability, security, and performance. Most of the time S3 is been used to store static content of you web application frontend. 

Key Concepts to Master

  • Understanding object storage and the basics of S3 buckets.
    • Amazon S3 to host a static website. On a static website, individual webpages include static content. They might also contain client-side scripts.
    • Deeply couple with AWS Cloudfront for content delivery
  • Uploading, downloading, and managing objects in S3.
    • Object versioning 
  • Overview of data durability, availability, and access control.
    • Public Access 
    • Private Bucket & Bucket Policy 

Video –> Secure Static Hosting with S3, CloudFront and OAI  


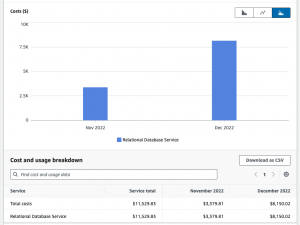
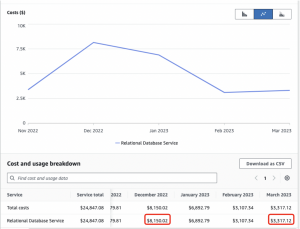
Database or AWS fully managed Relational Database (RDS) RDS

Amazon Relational Database Service (Amazon RDS) is a collection of managed services that makes it simple to set up, operate, and scale databases in the cloud. Choose from seven popular engines — Amazon Aurora with MySQL compatibility, Amazon Aurora with PostgreSQL compatibility, MySQL, MariaDB, PostgreSQL, Oracle, and SQL Server.  

Key Concepts to Master

  • Creating and configuring RDS instances.
    • Select the Database engine and Size of the instance 
  • Connecting applications to RDS databases.
    • Security group configuration and port configuration 
    • RDS Cluster (Reader & Writer Instances and Endpoints)

Video –> AWS RDS MySQL Database Setup | Step by Step Tutorial


Monitor & Access Your Application Logs via CloudWatch Cloudwatch

Amazon CloudWatch collects and visualizes real-time logs, metrics, and event data in automated dashboards to streamline your infrastructure and application maintenance. Must have tool to troubleshoot and debug your application issues. 

Key Concepts to Master

  • Application Logs
    • Log Groups which collect the service logs 
    • Log Insights to query logs 
  • Setting up alarms and notifications.
    • Setup infrastructure alarms 
    • Create monitoring dashboards 
    • Define rules to trigger events (Lambda functions)
  • Using AWS CloudTrail for auditing and tracking API activity.
    • To monitor AWS service level access

Video –> AWS Cloudwatch Service Overview | Console Walkthrough


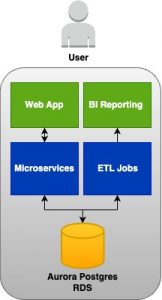
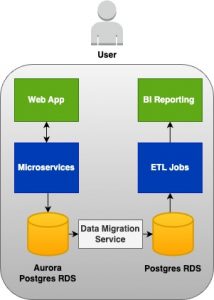
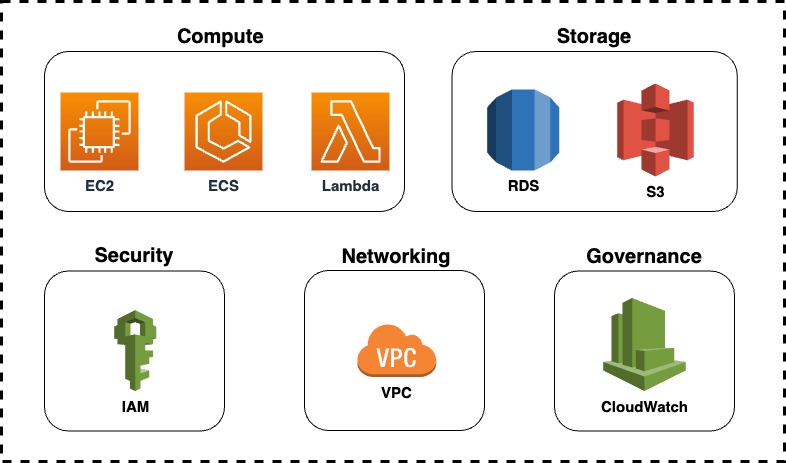
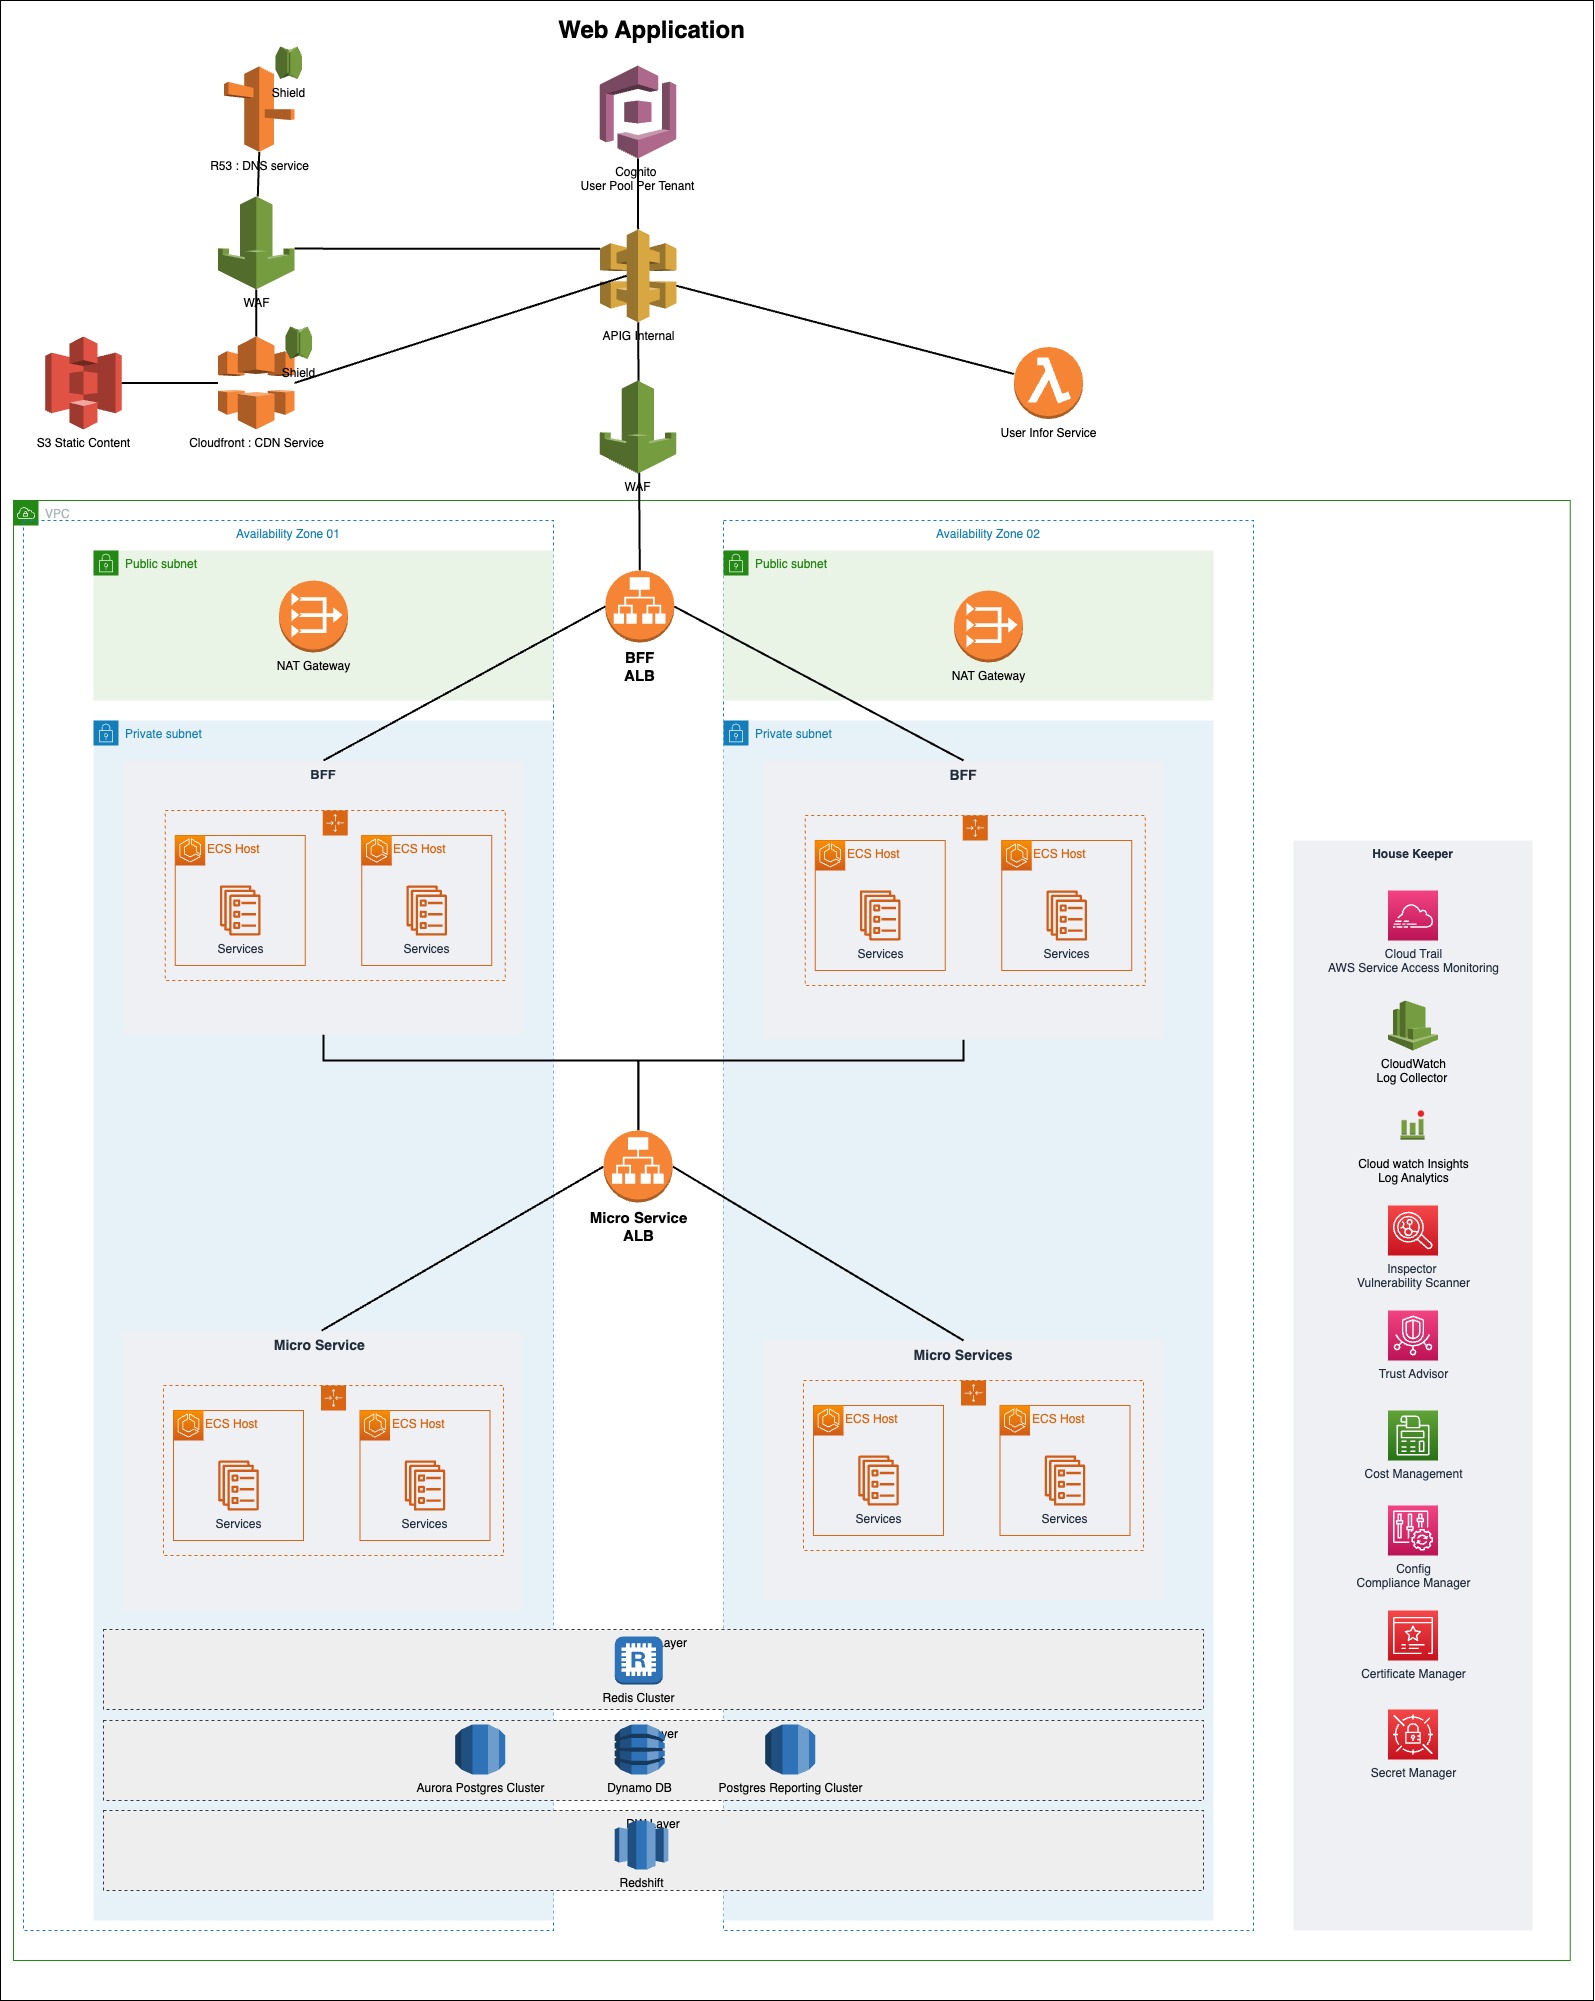
By delving deeper into the services and their key features mentioned above, you can acquire the necessary skills to advance in your software engineering journey. Given below is a sample architecture diagram where you have the services we mentioned and some more additional ones.

Architecture


Below, you’ll find valuable links to help you study these services extensively. I hope these resources assist you in mastering AWS services and transforming into an AWS Ninja within your organization.

  1. AWS Networking Fundamentals
  2. AWS IAM Core Concepts You NEED to Know
  3. Secure Static Hosting with S3, CloudFront and OAI  
  4. Launch an AWS EC2 Instance Tutorial
  5. Deploy an Application to Amazon ECS With EC2 | Docker | ECR | Fargate | Load balance
  6. How to Deploy AWS Lambda using Serverless Framework
  7. AWS RDS MySQL Database Setup | Step by Step Tutorial
  8. AWS Cloudwatch Service Overview | Console Walkthrough
  9. Intro to AWS – The Most Important Services To Learn

Read More

Cost-Effective Scaling: Optimizing RDS Expenses While Simultaneously Facilitating Business Growth

This marks the inaugural article in a series titled ‘Initiate your SaaS journey by taking small steps and steadily enhancing capabilities with AWS‘,  The series delves into the challenges faced during the early years of my SaaS industry journey (Velaris.io) and how these obstacles were overcome through a gradual improvement approach with AWS capabilities and Practical Engineering.

In this article, we will explore a specific use case where we encountered a substantial 140% increase in RDS costs compared to the previous month’s bill in AWS. We will delve into the design changes we implemented in our architecture to effectively resolve this cost surge.


RDS Costs Surged by 140% Between November and December

As depicted in the chart, there was a notable 1.5X rise in RDS cost between November 2022 (3300 USD) and December 2022 (8000 USD). This unexpected increase prompted us to conduct a thorough analysis to understand the factors contributing to this cost surge.


Analysing the Problem

Initially, we began our investigation by reevaluating our existing application architecture and its associated data load. Concurrently, we utilised the AWS Cost Explorer tool to gain a more detailed breakdown of the RDS cost.

The diagram illustrates that we were employing a single Database (DB) to manage both our Web application data load and Reporting ETL data load. This meant that a single RDS Aurora Postgres instance handled all data storage and processing load. Additionally, in December, three new customers joined our platform, and their data volumes were significantly larger compared to the four existing customers.

The Cost Explorer analysis revealed a direct correlation between the increased data load from the new customers and the rising I/O requests in the Aurora Postgres database, which served as the primary cost driver. The diagram below depicts the substantial surge in I/O operations during this period. Our final conclusion was that the influx of data from the new customers led to extensive processing time and necessitated a large number of I/O operations in DB.

In light of these findings, we promptly recognised the need to make architectural changes to address scalability issues and optimise costs effectively.


Realising the Solution

The optimal resolution entails a twofold approach: reducing RDS costs and enhancing application architecture scalability. To achieve cost reduction, we must transition to a different RDS type with a more suitable costing strategy than Aurora Postgres, aligning precisely with our requirements. Moreover, to bolster scalability, it is imperative to decouple the reporting data processing, or the ETL process, from the Web app DB. By implementing these strategic changes, we can attain a more cost-effective and scalable solution for our application.

Upon careful analysis of RDS costing, it became evident that Postgres RDS emerged as the superior choice for handling heavy data processing compared to Aurora Postgres in our use case. The following cost-related factors elucidate why it was the more favorable option:

  • Aurora Postgres: 0.20$ per 1 million I/O requests
  • RDS Postgres: $0.116 per IOPS-month of provisioned io1 IOPS (input/output operations per second)

Another key factor is that, we can configured how much IOPS we need to provision in our Postgres RDS instance. Let’s take this example I took from AWS EBS Cost;

For example, let’s say that you provision a 2,000 GB volume for 12 hours (43,200 seconds) in a 30-day month. In a region that charges $0.125 per GB-month, you would be charged $4.167 for the volume ($0.125 per GB-month * 2,000 GB * 43,200 seconds / (86,400 seconds/day * 30-day month)).

Additionally, you provision 1,000 IOPS for your volume. In a region that charges $0.065 per provisioned IOPS-month, you would be charged $1.083 for the IOPS that you provisioned ($0.065 per provisioned IOPS-month * 1,000 IOPS provisioned * 43,200 seconds /(86,400 seconds /day * 30-day month)).

For this example, the charges would be:
$5.25 ($4.167 + $1.083).


Replication via AWS Data Migration Service (DMS)

Upon settling on the decision to utilise RDS Postgres as the reporting database, the subsequent challenge arose: devising a way to establish data replication between the Aurora DB and the Reporting RDS DB. Given that these two were distinct DB instance types and necessitated Master – Master data replication, we embarked on evaluating several AWS services.

After careful consideration, we opted for the AWS Data Migration Service (DMS) to facilitate the one-way data replication from the Web App DB to the Reporting DB. The appeal of DMS lies in its fully managed nature by AWS, which translates to zero operational costs. Consequently, we proceeded with DMS and, to date, have encountered no issues with the replication process.

Finally, by combining all the aforementioned components, we successfully realised our desired architecture, as illustrated in the image below.


Final Outcome and Learnings

Our primary objective was to decrease the RDS cost. By February, following the aforementioned modifications, we achieved a remarkable 140% reduction in RDS expenses. The diagram below clearly demonstrates the significant decrease in RDS costs.

Furthermore, this architectural alteration not only led to substantial cost reduction but also significantly enhanced the stability of our application. The full decoupling of the Web App DB from the Reporting Data load ensured that user interactions with the application would not interfere with ETL data load processing, resulting in improved overall application stability.

An essential lesson learned from this experience is the importance of continuously reassessing the architecture during periods of business growth. Making precise design choices promptly and adeptly in response to rapid changes is imperative to achieving and sustaining successful outcomes.

Through this article, I aimed to share my experiences on effectively optimising RDS costs while supporting business growth. I intend to build on this knowledge by presenting more use cases in the forthcoming months as part of my article series, ‘Initiate your SaaS journey by taking small steps and steadily enhancing capabilities with AWS‘. I hope these future articles will provide valuable insights to readers, guiding them in their own SaaS journey and AWS implementation.


Read More

Let’s start the 2021 New Year with SOLID Principles

Firstly, let’s figure out what do you meant by SOLID Principles. SOLID principles are set of five principles that can be used in Object-Oriented programming. It’s a set of best practices / design patterns to follow when you are designing a class/object structure.

One famous quote in software engineering is “It is not enough for code to work” by Robert C Martin, Clean Code. Keeping that in mind let’s evaluate the SOILD principles and how it will help software development in the long run.

When and why we need to apply SOLID?

SOLID principles will help us to lay the foundation on building clean and maintainable architectures.

When you don’t design your application with best practices, you will end up with many issues sooner than later. For examples

  • High Code Fragility: Fragility is the tendency of the software to break in many places when every time its changed
  • High Code Rigidity: Rigidity is the tendency for software to be difficult to change, even in simple ways

Having fragility and rigidity in your project means having symptoms of tech debt, which is the silent killer of all software projects. In most of the software development process, with the business priority and push towards for quick delivery, engineers tend to prioritize fast delivery over code quality which will tend to introduce technical debt.

Applying SOLID principles help us to control the technical debt.  What are those SOLID Principles?

  1. SRP – Single Responsibility Principle
  2. OCP – Open Close Principle
  3. LSP – Liskov Substitution Principle
  4. ISP – Interface Segregation Principle
  5. DIP – Dependency Inversion Principle

Let’s take each principle one by one and understand it in very high level so we can apply them in our projects.

Single Responsibility Principle (SRP)

A Class should do only one thing, and therefore it should have only a single reason to change. Some of the common responsibilities in our code are, Business Logic, User Interface, Persistence, Logging and Orchestration.

A common anti-pattern is that, In an Invoice class having the implementation of printInvoice and saveToFile like functions. Ideally those two should be in different classes. Those classes might be InvoicePrinter and InvoicePersistence and those classes will have a single responsibility.

Also avoid common Utils class for having all helper functions. Have specialized classes where you can have them.


Open Close Principle (OCP)

OCP means, Classes should be open for extension and closed to modification. Closed for modification means that each new feature should not modify existing source code. Open for extensions means a component should be extendable to make it behave in new ways.

There are two OCP implementation strategies. One is via Inheritance and other via Strategy pattern. The common usage is to use the strategy pattern to extend the behaviors. For example, having an interface called InvoicePersistence and implementing any number of different classes (DB persistence, File Persistence) based on the main interface. This ensure Invoice Persistence is extendable in many ways.


Liskov Substitution Principle (LSP)

What is Liskov principle? In simple terms, “Any object of a type must be substitutable by objects of a derived typed without altering the existing functionality of that program”. Rather than thinking about the Is-a relationship, just think on Is-substitutable-by in object relationships of your application context and design the objects hierarchy is the key takeaway of LSP. We will observe violations of LSP, when there are partial implemented interfaces in classes (functions which are throwing not implemented exception).  Therefore, avoid empty implementations and have proper class hierarchy to avoid such scenarios.


Interface Segregation Principle (ISP)

The key point to note here is that, the term interface is not referring to Java Interface. It can be an interface or abstract class in your application. By definition ISP defined as “Clients should not be forced to depend on methods that they do not use”. Therefore, having small interfaces with a single focus will comply the ISP. By doing so, it will reinforce the LSP and SRP. Key advantage of lean interface is that, minimize dependencies on unused members and reduce code coupling. How to identify that you have “Fat” interface? it’s not much difficult, if you see an interface with large number of method definitions is a symptom for Fat interface. Analyze the interfaces and break it down is the way forward. If you are dealing with legacy code and wanted to refactor the code to adhere the ISP, then you can use the “Adaptor” design pattern to fix the existing issues.


Dependency Inversion Principle (DIP)

This principle mainly captures key two concepts, Dependency Injection (DI) and Inversion of Control (IoC) and how those should be used in our application. Those two concepts are well known concepts, following reference link will explain them in detail. (DI, IoC) Java framework like Spring framework have those two concepts in-build.

This conclude the five principles under SOLID principles. You can find good code samples under the reference section for each principle as well. In addition to SOLID, there are few other ways to keep your architecture clean, for example: constant refactoring, application of design patterns, TDD / Unit testing. When you apply SOLID Principles, you will also get the following as short and long-term benefits.

  • Code will be easy to understand and reason about
  • Changes are faster and have minimum risk level
  • Highly maintainable in the long run
  • Cost effective

Decision on applying them in correct scenario is totally up to you!


Reference

https://www.baeldung.com/solid-principles

https://www.digitalocean.com/community/conceptual_articles/s-o-l-i-d-the-first-five-principles-of-object-oriented-design#:~:text=SOLID%20is%20an%20acronym%20for,OOD)%20principles%20by%20Robert%20C.&text=O%20%2D%20Open%2Dclosed%20Principle,I%20%2D%20Interface%20Segregation%20Principle

https://app.pluralsight.com/library/courses/solid-software-design-principles-java/table-of-contents

https://refactoring.guru/design-patterns/adapter

https://dzone.com/articles/ioc-vs-di

Read More

Making Your Enterprise Application 100% Serverless with AWS

There was an era in which we all fussed about cloud computing; however, right now the hype is mainly about serverless computing. In this article, I will brief you about serverless computing and share my experience in working with some serverless technologies that my team and I used to develop enterprise solutions.

My list of topics are as follows – each will have a quick introduction the technology used along with some web links which we looked at when integrating these into our final solution.

  • Serverless Computing
  • Requirement
  • Architecture & AWS Services
  • Lambda Functions for Microservices and BFF
  • API Gateway
  • Cognito for User Federation
  • ECS Fargate for Long Running Tasks
  • AWS Code Pipeline & Code Build for CI/CD
  • Other Services

[Please visit this link to get details on each of the above topics]

Read More

Client Side Load Balancing Vs Server Side Load Balancing: How Client Side Load Balancing works?

Firstly let’s see what is load balancing;

It’s mainly distributing work of a computer to two or more similar computers. This ensures reliability and increases the responsiveness of the system.


Load balancer generally group in to two categories.

Layer 4: Act in network and transport layer protocols (IP, TCP, FTP, and UDP)

Layer 7: Distribute requests based upon data found in application layer protocols such as HTTP


Also Load Balancer (LB) reside in two types, (more information)

Hardware LB: F5 BIG-IP, Cisco, Citrix

Software LB: NGINX, HAProxy, LoadMaster


All these different load balancers uses different algorithms to distribute the load among the application pool. Some of the industry standard Load Balancing algorithms are:

  • Round robin: This method continuously rotates a list of services that are attached to it. When the virtual server receives a request, it assigns the connection to the first service in the list, and then moves that service to the bottom of the list.
  • Least connections: The default method, when a virtual server is configured to use the least connection, it selects the service with the fewest active connections.
  • Least response time: This method selects the service with the fewest active connections and the lowest average response time.

Now that’s all about the very basic theory in Load balancing. Now let’s see how Server side load balancing works in the real world.


Server Side Load Balancing

A Server side load balancer sits between the client and the server farm accepting incoming network and application traffic and distributing the traffic across multiple backend servers using various methods. Mostly load balancer will check the health of the server pool underneath and use the algorithm which we discussed earlier to distribute the load.  This was the most common mechanism we used in the past to manage our application load. However the upswing of Client Side Load Balancing is now on the peak. Let’s dig deep on that context.


Client Side Load Balancing

As we discussed, in the server side load balancing, a middle component is responsible for the distributing the client requests to the server. However that middle component is moving out on the decision making in the load distribution. Client itself will decide on the server it need to forward the request. How it work is very simple: Client holds the list of server IPs that It can deliver the requests. Client select an IP from the list randomly and forward the request to the server.

With the microservice architecture, Client side load balancing plays a major role. Services like Netflix Ribbon and Eureka components helps client side load balancing have similar features to server side load balancing like fault tolerance, caching and batching.

Let’s see how Eureka and Ribbon work together to achieve the client side load balancing in microservice architecture.


As per the above diagram, let’s assume Microservice B wants to communicate with Microservice C. So Microservice B is the client and now it will use the Eureka client and get what nodes (server list) are available in Microservice C. Then using ribbon client in the Microservice B, it will call the Microservice C using default round robin algorithm. So the method which Microservice B used to call Microservice C is known as client side load balancing. Which illustrates that client is the one decide on the server which need to call not a middle component like in Server side load balancing.


All the links are provided as references to get more inside on the topic we have covered. Especially how you can use Netflix OSS to achieve client side load balancing in microservice solutions.


References


Read More

Twelve factors to consider when developing cloud native applications (SaaS)

This is a basic introduction to cloud native application development. First we will get a basic idea about the cloud concept and then move in to the 12-Factors.


What is cloud computing environment?

It’s a dynamic environment, which have the capability to allocate resources and release of resources from a virtualized, shared pool. This elastic environment enables more flexible scaling options for a high demand applications.


What is cloud native application?

Applications or processes which are run in software containers as isolated units. Applications or services (microservices) are loosely coupled with explicitly described dependencies. There are set of best practices which you need to follow when you’re planning moving to cloud with your application. Those are known as the 12-factors. Let’s investigate on those 12-factors.


Twelve factors

The 12-factor application methodology was drafted by developers at Heroku. The factors represent a set of guidelines or best practices for portable, resilient applications that will thrive in cloud environments (specifically software as a service applications). Let’s move in to each factor and get a high level idea on how we can achieve / implement this in our application.

  1. There should be a one-to-one association between a versioned codebase: Main idea is not to have different codebases for your application versions. You can have branches for different versions as a solution to avoid repository complexity.


  1. Services should explicitly declare all dependencies, and should not rely on the presence of system-level tools or libraries: Main recommendation here is that avoid in pre-installed software in the system level which has a dependency with your application. As a solution we should try our level best to put application dependencies in our application manifest. Tools like Apache Maven can be used to maintain these dependencies in your application.


  1. Configuration that varies between deployment environments should be stored in the environment: In this scenario the recommendation is to avoid having environment (Development, Staging and Production) specific configuration with in your application code. If you have any environment specific configurations those need to be stored in the environment not in the application. To have the configuration files in a centralized location we can use the spring config server


  1. All backing services are treated as attached resources, which are managed (attached and detached) by the execution environment: Firstly backing service is any service that your application integrate with to perform its normal operations. So, examples for backing service would be database, web services, SMTP server or ftp server. Main idea of this practice is to treat those backing services as your own service.


  1. The delivery pipeline should have strictly separate stages: Build, release, and run: When we consider the three stages,
    • Build: Takes the source code and bundle to a package which referred as the build
    • Release: Combine the build and the config and create a release for deploy in an environment. Each release will have a unique identifier and related to a release management tool. It will ensure a quick rollback time.
    • Run: Referred as the runtime. Execute the application in the corresponding environment


  1. Applications should be deployed as one or more stateless processes: Specifically, transient processes must be stateless and share nothing. Persisted data should be stored in an appropriate backing service.


  1. Self-contained services should make themselves available to other services by listening on a specified port: This means each application are self-contained and expose access over a HTTP port that is bound to it. Spring boot framework is a good example for this, which is having a inbuilt server where you can configure the HTTP port easily


  1. Concurrency is achieved by scaling individual processes (horizontal scaling): Idea behind this is having multiple processes with distributed load. The application should be able to scale horizontally and handle requests load-balanced to multiple identical running nodes of the application. In addition application should be able to scale out processes or threads for parallel execution of work in an on-demand basis. This feature comes automatically with the JVM with multi-threading.


  1. Processes must be disposable: Fast startup and graceful shutdown. If we elaborate more our application should minimize the startup time like using backing services rather than using in-memory caching. Also in shutdown process, when we stop the application it should not accept new work and let existing work to finish. We can use a queue to push the work and then shutdown if required.


  1. All environments, from local development to production, should be as similar as possible: Development environment to production environment should be identical. It will ensure unexpected behavior in the application due to environment inconsistencies. Containerized environment like Dockers is a good solution for this.


  1. Applications should produce logs as event streams (for example, writing to stdout and stderr), and trust the execution environment to aggregate streams: Application should not attempt to write to or manage logfiles. This stream output should mainly managed by the execution environment. This stream can be shipped to a log indexing systems such as Splunk, ELK stack which facilitate as a centralized logging system.


  1. Run admin/management tasks as one-off process: If admin tasks are needed, they should be kept in source control and packaged alongside the application to ensure that it is run with the same environment as the application

References

Read More

Microservices Architecture Implementation: Tech / Tool Stack Map

There are different tool stacks like nodeJs, Spring cloud which we can use to build microservice solutions. Since I’m having a Java background, in this post we will look how the spring cloud solution will help us to develop comprehensive microservices solution. This tool set is applied in my working environment and it’s running smoothly in Production setup.

Due to excellent tool support and easy integration capabilities Spring cloud with spring boot framework makes developer life stress-free.

Below diagram illustrates the full component stack. Will give you a very high level usage of each component in this post. Later we can dig deep in to each component.

Microservices architecture solutions implementation using Java framework: Spring Boot / Spring Cloud Components

  • RAML / Swagger / Thrift : Used to design Contract-First microservices
  • Zuul : Edge Server, Reverse proxy server. API gateway or gate keeper for external parties
  • Eureka : Act as Service registry & discovery component
  • Ribbon : Load balancer
  • Spring Cloud Config : Centralized configuration server for the MSA solution
  • OAuth2 / JWT : Security mechanisms which can be integrated with microservices
  • Hystrix : Monitoring dashboard for the services and fault tolerance configuration component
  • Redis / memchached : Distributed caching mechanisms
  • AMQP / MQTT / STOMP : Messaging protocols for asynchronous communication
  • REST / Thrift : Messaging mechanisms for synchronous communications
  • Docker / OpenStack : Deployment architectures for our microservices
  • Tomcat / Jetty : In-build servlet containers in Spring boot


With all the above tools and components we can build a production ready microservice solution in rapid speed. In the coming posts let’s try to grab more knowledge in those areas.


References

Read More

How Microservices fitting in Enterprise SOA Solutions

In previous posts we discussed on different topics of Service Oriented Architecture and Microservices. In this post we will discuss how Microservices moving in to the traditional SOA solutions.

In software engineering, SDLC (System Development Life Cycle) is a well know process. Similarly when we want to develop SOA solutions, there is similar process which is illustrated in the below diagram.

In the Service Oriented Analysis and Design stages, microservices comes in to the picture.  Before we proceed let’s get a quick introduction to microservices. In SOA world microservice represent a specific performance / reliability requirement (business process) in a SOA solution. Its holds a distinct implementation environment optimized to support special processing demands that required for performance and reliability needs. Microservice is an independent service, however when a microservice needs to access other resources (services), those resources can either be replicated or redundantly implemented so that they remain part of the microservice’s local processing scope. Therefore, when it is decided that a microservice needs to compose another service, the composed service may be redundantly implemented and deployed together with the microservice.


Service Analysis and Modeling Process

Now let’s check how microservices are produced in a SOA solution on a given Business Process.


Step 1 | Analysis of the Business Process:

Main goal of this step is to decompose the business process to smaller processors. To achieve this we can follow the below steps

  • Identify main processors in the business process
  • Breakdown each main process in to small processes
  • Draw the detail business process flow diagram
  • Identify small processes which cannot be automated or should not be automated. Those processes should only handle through a manual process. So remove them from the list of process which are candidates for service implementation


Step 2 | Define Entity Services:

From the list of processes which are candidates’ service implementation, find out reusable agnostic services candidates and its capabilities.  Those services can be categorized as entity services.


Step 3 | Define Task Services:

These are the services which has process specific logic (non-agnostic). After identifying the entity services, the remaining can be categorized under task service. Normally we can find business rules, conditional logic which is specific to a process in this kind of services.


Step 4 | Apply Service Orientation:

Revisit the services which we have categorized and try to apply service orientation principles on them. Service loose coupling, Service abstraction and Service autonomy to those services.


Step 5 | Identify Service Composition Candidates:

In this step, we will look at the entity and task services that we captured during earlier stages and check whether those are candidates for service compositions.


Step 6 | Analyze the processing requirements:

For each process / sub process we need to follow the following steps to identify special requirements

  • What are the processing logic required in each service
  • Did we identified them earlier or do we need to redevelop them
  • What are the external resources we need to access via our services (DB, Message Brokers, Legacy systems)
  • Any logic critical for performance and reliability
    • This is the point where need of microservices comes in to picture in SOA solution
    • By producing performance and reliability critical services as microservices, we can ensure other services won’t have any impact from those performance critical services. Since those are run independently


Step 7 | Define Utility Services:

From the agnostic processing logic which we identified earlier, check if there are any reusable utility services. For example logging services and notification services.


Step 8 | Define microservices candidates:

Revisit the non-agnostic process logic which we identified earlier and determine any of the logic can be represent as microservices. Ideal candidate for a microservice would be

  • Volatile requirement
  • Performance requirement
  • Runtime reliability and failover requirement
  • Service visioning and deployment requirement


Step 9 | Apply service orientation:

As we did in the step four, repeat the same process to utility and microservices which we identified earlier


Step 10 | Revisit the service composition candidates:

Check whether we can use the microservices and utility services for other service requirements


That’s pretty much it, on the process of analysis and design stage of services in a SOA solution. So we can clearly see where the microservices coming in to play in the SOA solution development process.


References

Read More

Developing SOAP web service with Spring Boot and Spring-WS

In the current developer world, we speak very less about SOAP web services. This is due to the REST web services dominance in SOA world. However the need for SOAP services will never be zero.

In this document we will focus on how we can develop SOAP web services using popular Spring Boot framework and Spring-WS. When I searched the internet for tutorials I found this useful tutorial, which explain on how to develop SOAP services. There were some missing items in the tutorial and thought of adding them to have a complete steps tutorial.

Spring-WS mainly focus on document driven web services. Hence Spring-WS facilitate the contract-first SOAP web services development. Let’s see how we can develop a simple contract first web service using the following tool set.

  • Spring Boot 1.5
  • Spring-WS 2.4
  • Maven 3
  • Tomcat application server 7
  • Eclipse IDE

Final out put product would be a deployable war file which exposes a SOAP web service to its clients.

Let’s start the development

Initial Project Setup

  1. Create a maven project in eclipse

File –> New –> Other –> Maven Project –> Select “maven-archetype-webapp” –> Provide the Group Id and Artifact Id and save

  1. Create Build Path

Right click on the project –> Build Path –> Configure Build Path –> Under the “Source” tab remove the unsolved items and add the following folder to build path

  • src/main/java
  • src/test/java
  • src/test/resources


Creating the POM

  1. By default we have a POM file under the project structure to insert the dependencies.
  • We are using Spring Boot in our project and for testing we are using the embedded Apache Tomcat server
  • Parent POM of spring boot is used to facilitate the spring dependencies.
<parent>
    <groupId>org.springframework.boot</groupId>
    <artifactId>spring-boot-starter-parent</artifactId>
    <version>1.5.1.RELEASE</version>
</parent>
  • To facilitate the Spring-WS dependencies following dependency element included in the POM
<dependency>
    <groupId>org.springframework.boot</groupId>
    <artifactId>spring-boot-starter-web-services</artifactId>
</dependency>
  • To include the testing support on Spring Boot application following dependency for included in the POM
<dependency>
  <groupId>org.springframework.boot</groupId>
  <artifactId>spring-boot-starter-test</artifactId>
  <scope>test</scope>
</dependency>
  • To create a runnable jar, which can be run on the built it Tomcat: we will add the following plugin in the build tag
<build>
        <plugins>
            <plugin>
                <groupId>org.springframework.boot</groupId>
                <artifactId>spring-boot-maven-plugin</artifactId>
            </plugin>
            <plugin>
                <groupId>org.jvnet.jaxb2.maven2</groupId>
                <artifactId>maven-jaxb2-plugin</artifactId>
                <version>${maven-jaxb2-plugin.version}</version>
                <executions>
                    <execution>
                        <goals>
                            <goal>generate</goal>
                        </goals>
                    </execution>
                </executions>
                <configuration>
                    <schemaDirectory>                      ${project.basedir}/src/main/resources/wsdl</schemaDirectory>
                    <schemaIncludes>
                        <include>*.wsdl</include>
                    </schemaIncludes>
                </configuration>
            </plugin>
        </plugins>
</build>


  • Full POM files as follows
<?xml version="1.0" encoding="UTF-8"?>
<project xmlns="http://maven.apache.org/POM/4.0.0" xmlns:xsi="http://www.w3.org/2001/XMLSchema-instance"
    xsi:schemaLocation="http://maven.apache.org/POM/4.0.0 http://maven.apache.org/xsd/maven-4.0.0.xsd">
    <modelVersion>4.0.0</modelVersion>

    <groupId>com.codenotfound</groupId>
    <artifactId>spring-ws-helloworld-example</artifactId>
    <version>0.0.1-SNAPSHOT</version>
    <packaging>jar</packaging>

    <name>spring-ws-helloworld-example</name>
    <description>Spring WS - SOAP Web Service Consumer &amp; Provider WSDL Example</description>
    <url>https://www.codenotfound.com/2016/10/spring-ws-soap-web-service-consumer-provider-wsdl-example.html</url>

    <parent>
        <groupId>org.springframework.boot</groupId>
        <artifactId>spring-boot-starter-parent</artifactId>
        <version>1.5.1.RELEASE</version>
    </parent>

    <properties>
        <project.build.sourceEncoding>UTF-8</project.build.sourceEncoding>
        <project.reporting.outputEncoding>UTF-8</project.reporting.outputEncoding>
        <java.version>1.8</java.version>

        <maven-jaxb2-plugin.version>0.13.1</maven-jaxb2-plugin.version>
    </properties>

    <dependencies>
        <dependency>
            <groupId>org.springframework.boot</groupId>
            <artifactId>spring-boot-starter-web-services</artifactId>
        </dependency>
        <dependency>
            <groupId>org.springframework.boot</groupId>
            <artifactId>spring-boot-starter-test</artifactId>
            <scope>test</scope>
        </dependency>
    </dependencies>

    <build>
        <plugins>
            <plugin>
                <groupId>org.springframework.boot</groupId>
                <artifactId>spring-boot-maven-plugin</artifactId>
            </plugin>
            <plugin>
                <groupId>org.jvnet.jaxb2.maven2</groupId>
                <artifactId>maven-jaxb2-plugin</artifactId>
                <version>${maven-jaxb2-plugin.version}</version>
                <executions>
                    <execution>
                        <goals>
                            <goal>generate</goal>
                        </goals>
                    </execution>
                </executions>
                <configuration>
                    <schemaDirectory>${project.basedir}/src/main/resources/wsdl</schemaDirectory>
                    <schemaIncludes>
                        <include>*.wsdl</include>
                    </schemaIncludes>
                </configuration>
            </plugin>
        </plugins>
    </build>

</project>
  • Now to ensure all works accordingly, let’s build the application. Locate the directory location where your POM file reside and run the below command
mvn install


Creating the Contract (WSDL)

  1. Spring web services supports contract first approach only in web services development. So let’s start the with the WSDL (contract)
  • In a WSDL there are key elements
    • <types>
    • <message>
    • <portType>
    • <binding>
  • In our contract we have the following
    • XSD Schema which has two elements
      • “Person” : Request Object
      • “Greeting” : Response Object
    • Message elements
      • “SayHelloInput” : mapping of the XSD object to the message element
      • “SayHelloOutput” : mapping of the XSD object to the message element
    • PortType element
      • Binding the input/output messages to SOAP function “sayHello”
    • Binding element
      • Define the SOAP action and configuring the SOAP body for input/output
    • Service element
      • Defines the SOAP function and the message formats for the service which we are exposing
    • Detail WSDL as follows
<?xml version="1.0"?>
<wsdl:definitions name="HelloWorld"
    targetNamespace="http://codenotfound.com/services/helloworld"
    xmlns:tns="http://codenotfound.com/services/helloworld" xmlns:types="http://codenotfound.com/types/helloworld"
    xmlns:soap="http://schemas.xmlsoap.org/wsdl/soap/" xmlns:wsdl="http://schemas.xmlsoap.org/wsdl/">

    <wsdl:types>
        <xsd:schema targetNamespace="http://codenotfound.com/types/helloworld"
            xmlns:xsd="http://www.w3.org/2001/XMLSchema"
            elementFormDefault="qualified" attributeFormDefault="unqualified"
            version="1.0">

            <xsd:element name="person">
                <xsd:complexType>
                    <xsd:sequence>
                        <xsd:element name="firstName" type="xsd:string" />
                        <xsd:element name="lastName" type="xsd:string" />
                    </xsd:sequence>
                </xsd:complexType>
            </xsd:element>

            <xsd:element name="greeting">
                <xsd:complexType>
                    <xsd:sequence>
                        <xsd:element name="greeting" type="xsd:string" />
                    </xsd:sequence>
                </xsd:complexType>
            </xsd:element>
        </xsd:schema>
    </wsdl:types>

    <wsdl:message name="SayHelloInput">
        <wsdl:part name="person" element="types:person" />
    </wsdl:message>

    <wsdl:message name="SayHelloOutput">
        <wsdl:part name="greeting" element="types:greeting" />
    </wsdl:message>

    <wsdl:portType name="HelloWorld_PortType">
        <wsdl:operation name="sayHello">
            <wsdl:input message="tns:SayHelloInput" />
            <wsdl:output message="tns:SayHelloOutput" />
        </wsdl:operation>
    </wsdl:portType>

    <wsdl:binding name="HelloWorld_SoapBinding" type="tns:HelloWorld_PortType">
        <soap:binding style="document"
            transport="http://schemas.xmlsoap.org/soap/http" />
        <wsdl:operation name="sayHello">
            <soap:operation
                soapAction="http://codenotfound.com/services/helloworld/sayHello" />
            <wsdl:input>
                <soap:body use="literal" />
            </wsdl:input>
            <wsdl:output>
                <soap:body use="literal" />
            </wsdl:output>
        </wsdl:operation>
    </wsdl:binding>

    <wsdl:service name="HelloWorld_Service">
        <wsdl:documentation>Hello World service</wsdl:documentation>
        <wsdl:port name="HelloWorld_Port" binding="tns:HelloWorld_SoapBinding">
            <soap:address
                location="http://localhost:9090/codenotfound/ws/helloworld" />
        </wsdl:port>
    </wsdl:service>

</wsdl:definitions>


Java Code Implementation

  1. Now our contract is ready. And we have some element defined which we use in SOAP request / response objects. Using JAXB we can easily generate the Java classes associated with those elements
  • Create a folder under “/src/main/resources/” called “wsdl” and copy the created wsdl file to the new directory created
  • In the POM under <plugins> element we have configured a “maven-jaxb2-plugin” to facilitate this class creation
  • The generated java classes will be located in the “target” directory
  • To generate the those classes run the following command
mvn generate-sources


  1. The generated java classes will be in the “target” folder and we need add the folder to build path
  • Locate the following directory “/target/generated-sources/xjc”
  • Right Click on the folder –> Build Path –> Use as Source Folder


Now the initial setup is completed for the project. Let’s create the necessary packages and start implementing the code. As I mentioned earlier will continue on the post which was publish in www.codenotfound.com.  You can start with the Java code implementation of the link, which is creating the “SpringWsApplication ” class. Also in the tutorial you can download source code.


Generate a “WAR” file to deploy in Tomcat

If you want to generate a “WAR” file which can deploy in tomcat, please follow the below steps:

Change in the SpringBootApplication Class

package com.codenotfound;

import org.springframework.boot.SpringApplication;
import org.springframework.boot.autoconfigure.SpringBootApplication;
import org.springframework.boot.builder.SpringApplicationBuilder;
import org.springframework.boot.web.support.SpringBootServletInitializer;

@SpringBootApplication
public class SpringWsApplication extends SpringBootServletInitializer {

  @Override
  protected SpringApplicationBuilder configure(
      SpringApplicationBuilder application) {
    return application.sources(SpringWsApplication.class);
  }

  public static void main(String[] args) throws Exception {
    SpringApplication.run(SpringWsApplication.class, args);
  }
}


Changes in the POM.xml

  • Add the below dependencies
<dependency>
  <groupId>org.springframework.boot</groupId>
  <artifactId>spring-boot-starter-thymeleaf</artifactId>
</dependency>

<!-- marked the embedded servlet container as provided -->
<dependency>
  <groupId>org.springframework.boot</groupId>
  <artifactId>spring-boot-starter-tomcat</artifactId>
  <scope>provided</scope>
</dependency>


  • Update the <packaging> element from jar to war
<packaging>war</packaging>


  • Rerun the mvn command
mvn clean install


Read More

Is Microservices Architecture a sub set of SOA? (Understanding Microservices Architecture by wearing the Developers Thinking Hat)

In the previous posts we looked in to the basic concepts of SOA. Thought of moving to a new term in the technology world called Microservices Architecture. Actually the term is the only thing which is new to SOA world. The concepts behind the microservices architecture came with SOA. However if you’re not familiar with SOA and compare the microservices architecture with Monolithic applications development then this would be a new concept for you. Assuming you have the knowledge in SOA, we will justify the above argument which is Microservices Architecture is a sub set of SOA.

What is Microservices Architecture?

Microservices architectural style is an approach of developing a single application as a suite of small services, each running in its own process and communicating with lightweight mechanisms, often an HTTP resource API. These services are built around business capabilities and independently deployable by fully automated deployment machinery. There is a bare minimum of centralized management of these services, which may be written in different programming languages and use different data storage technologies. – “Martin, Fowler”

Let us concentrate on the definition of microservices architecture and discuss about each special characteristics.

The concept “small services which build around business capabilities”, is a concept we discussed under SOA. Which is Agnostic Logic and Entity Service concept in SOA. Those services are reusable, also concentrate on single small business problem.

The statement “Developing single application as a suite of small services” is yet another well establish concept in SOA known as “Service Composition”. There we have a Service Inventory which is a collection of reusable small services which will help to compose large services / applications.

The newly introduce concept on microservices architecture when compare to SOA is; microservices is individually deployable services which make them very easy to apply continuous integration and deployment. Where in SOA we deploy our services in shared resources. Microservices architecture is more driven by DevOps practices. Mostly deployed in cloud infrastructure, each service has the capability to auto scaling in built. With the immerging container technologies like Docker and surrounding technologies like Mesos and Kubernates will ensure the deploying micro services will be more unwind than ever. This concept will maximize the decoupling of logic and in addition the platform they are deployed. In the long run microservices architecture will minimize the change management cost compare to traditional SOA.

However if you have properly deign and implemented your SOA solution then you should be able to easily deploy your services independently in Tomcat / Nginx application servers across the nodes in your cluster too. Which will cover the key feature in micro services architecture.
In SOA, ESB and BPEL orchestration software plays a major role in building communication structures between different systems enterprise applications. Let’s see how microservices architecture replaces those tools.


ESB / BPEL Tools vs Smart Endpoints and dump pipes

Enterprise Service Bus (ESB) main capabilities are message routing, choreography, transformation, and applying business rules. In the microservices architecture ESB capabilities are covered through smart end points and dump pipes. REST protocol with different end points (smart endpoints) which has appropriate logic behind it will ensure the covering of ESB and BPEL orchestration capabilities we see in SOA. Application of a lightweight message bus act as the dump pipes in microservices architecture. It can be simply implemented using tools like RabbitMQ. The key added feature from dump pipes is reliable asynchronous messaging between services which is also common in SOA.

Below diagram illustrate the how microservices architecture differentiate from SOA.

Conclusion

So we can clearly see microservices architecture does not have much difference compare to SOA other than the deployment platform. Further as many articles express; “Microservices architecture is a design pattern of SOA” and Microservices architecture is a new term introduced to latch a new look to very old concept called SOA.


References

Read More